January 25, 2012

============TEST POST==================

It 's not so encouraging accepting guest posts on a blog hosted on blogger because except from the author's name at the top of the post, there's no plugin to automatically display author's bio below the post like Wordpress. You need to manually write the bio along with the post while composing and it's not so cool. If you recently started accepting guest posts, you need to manually edit those posts you've written previously just to make your bio appear on old posts.

This widget allows you to display author's bio below each and every blog post, even on blogs managed by many authors. Each and every one still get full credit for their work. This widget style is based on the very one Wordpress plugin I use on this blog and you can see the demo at doncaprio.blogspot.com. Check the latest posts there I made under different authors.

To get your blog ready for guest posting, you need to first send an invitation to the guest blogger by email.

- Go to Settings > Other

- Under Permissions, you should enter the guest blogger's email

Upon acceptance, the guest blogger can then log in to your blog to submit the proposed guest post. Though I'm now using Wordpress, I took some time to test out this on my old blogspot site to be sure it actually works fine.

Adding About Me / Author's Bio Below Each Blog Posts

1. Go to Design > Edit HTML or Template > Edit HTML depending on whether you're using the old or new blogger layout

2. Back up your template before proceeding you can easily restore it in case something goes wrong

3. Check the box labelled Expand Widget Template

4. Press CTRL + F on your keyboard and search for this:


]]></b:skin>

5. In the line just above this, paste this css style:


.dc-about-author-containter h3, .dc-about-author-containter p{
margin:0 0 10px 0;
padding:0;
}
.dc-about-author-containter{
background: #f2f7fc;
border: 1px solid #000;
clear: both;
margin: 20px 0;
overflow: hidden;
padding: 20px;
}
.dc-about-author-pic{
background: #fff;
border: 1px solid #e7e7e7;
float: left;
height: 100px;
width: 100px;
margin: 0 -122px 0 0;
padding: 10px;
}
.dc-about-author-pic img{
width: 100px;
}
.dc-about-author-text{
float: left;
margin: 0 0 0 140px;
}


6. We're done with the styling, now let's finish it up :)
We'll be using conditional statements to display different about me widget for diferent authors, ok?

Search for this code in your template:

<div class='post-footer-line post-footer-line-1'/>


7. Just below that, paste this code:


<!--BLOG ADMINISTRATOR WIDGET STARTS-->
<b:if cond='data:blog.pageType == &quot;item&quot;'>
<b:if cond='data:post.author == &quot;YOUR NAME&quot;'>
<div class='dc-about-author-containter' style='background-color: #ffffff;'><div class='dc-about-author-pic'><img alt='' class='avatar avatar-100 photo' height='100' src='YOUR PHOTO URL' width='100'/></div><div class='dc-about-author-text'><h3>About the Author</h3>
<p> ABOUT YOURSELF HERE </p>
<div align='right'><br/>
<a href='http://www.doncaprio.com.com/20112/01/author-bio-widget-for-multiple-different-authors-for-blogspot.html' style='text-decoration:none;font-size:70%;'>[Add this widget to your blog]</a></div></div></div>
</b:if>
</b:if>
<!--BLOG ADMINISTRATOR WIDGET ENDS-->


<!--GUEST WIDGET STARTS-->
<b:if cond='data:blog.pageType == &quot;item&quot;'>
<b:if cond='data:post.author == &quot;GUEST BLOGGER'S NAME&quot;'>
<div class='dc-about-author-containter' style='background-color: #ffffff;'><div class='dc-about-author-pic'><img alt='' class='avatar avatar-100 photo' height='100' src='GUEST BLOGGER'S PHOTO URL' width='100'/></div><div class='dc-about-author-text'><h3>About the Author</h3>
<p> ABOUT GUEST BLOGGER HERE </p>
<div align='right'><br/>
<a href='http://www.doncaprio.com.com/20112/01/author-bio-widget-for-multiple-different-authors-for-blogspot.html' style='text-decoration:none;font-size:70%;'>[Add this widget to your blog]</a></div></div></div>
</b:if>
</b:if>
<!--GUEST BLOGGER WIDGET ENDS-->


From BLOG ADMINISTRATOR WIDGET STARTS to BLOG ADMINISTRATOR WIDGET ENDS is for your own posts. This automatically displays your bio under your posts and you should edit all the characters in red as follows:
YOUR NAME - this is the name displayed under your posts as author's name.
YOUR PHOTO URL - your photo URL should be here. You can upload the picture to your Picasa album and then use the URL.
ABOUT YOURSELF HERE - A brief description about yourself with links to your social network and all that.


Below is a demo of what it looks like:
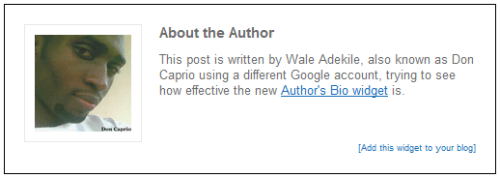
author bio widget for different authors on blogger / blogspot


You should also fill the details for the guest author appropriately.

You should also repeat the widget for guest author each time you get a new author with new details. The number of guest author bio widget you have in your template depends on the number of guest authors you have.

Below is the example of the one I used at doncaprio.blogspot.com:

<!--BLOG ADMINISTRATOR WIDGET STARTS-->
<b:if cond='data:blog.pageType == &quot;item&quot;'>
<b:if cond='data:post.author == &quot;Don Caprio&quot;'>
<div class='dc-about-author-containter' style='background-color: #ffffff;'><div class='dc-about-author-pic'><img alt='' class='avatar avatar-100 photo' height='100' src='http://photos-g.ak.fbcdn.net/hphotos-ak-ash4/228449_1814540321077_1167126869_31748108_8148594_n.jpg' width='100'/></div><div class='dc-about-author-text'><h3>About the Author</h3>
<p>Don Caprio is a part-time blogger living in Nigeria and apart from blogging, his other obsession is hip-hop music. You can follow him on <a href='http://twitter.com/doncaprio'>Twitter</a>, <a href='http://facebook.com/capriotips'>Facebook</a> or <a href='https://plus.google.com/104745456339871522709?rel=author'>Google+</a></p>
<div align='right'><br/><br/>
<a href='http://www.doncaprio.com.com/20112/01/author-bio-widget-for-multiple-different-authors-for-blogspot.html' style='text-decoration:none;font-size:70%;'>[Add this widget to your blog]</a></div></div></div>
</b:if>
</b:if>
<!--BLOG ADMINISTRATOR WIDGET ENDS-->


<!--BLOG ADMINISTRATOR WIDGET STARTS-->
<b:if cond='data:blog.pageType == &quot;item&quot;'>
<b:if cond='data:post.author == &quot;Wale Adekile&quot;'>
<div class='dc-about-author-containter' style='background-color: #ffffff;'><div class='dc-about-author-pic'><img alt='' class='avatar avatar-100 photo' height='100' src='http://photos-e.ak.fbcdn.net/hphotos-ak-ash2/181043_1659568286873_1167126869_31524002_2451553_n.jpg' width='100'/></div><div class='dc-about-author-text'><h3>About the Author</h3>
<p>This post is written by Wale Adekile, also known as Don Caprio using a different Google account, trying to see how effective the new <a href='http://www.doncaprio.com.com/20112/01/author-bio-widget-for-multiple-different-authors-for-blogspot.html'>Author&#39;s Bio widget</a> is.</p>
<div align='right'><br/><br/>
<a href='http://www.doncaprio.com.com/20112/01/author-bio-widget-for-multiple-different-authors-for-blogspot.html' style='text-decoration:none;font-size:70%;'>[Add this widget to your blog]</a></div></div></div>
</b:if>
</b:if>
<!--GUEST BLOGGER WIDGET ENDS-->


If you're having any problem with this widget don't hesitate to use the comment box and if it works for you, hit the google plus one button and say "thanks"!

December 3, 2011

5 Ways Download Facebook Videos

This summary is not available. Please click here to view the post.

December 2, 2011

Adding Link Tree / Breadcrumb Navigation Above Blog Posts

Just to increase pageviews, a blog must be designed in such a way to keep visitors busy, letting them explore parts of your site that might remain undiscovered without a design based on easy navigation. Just like the related post widget and numbered page navigation, adding breadcrumb navigation ( also called link tree) is just another way to keep your visitors engaged and stay longer on your blog. In case you don't know what link tree means, it's those links that shows where you are in a site and in blogger, it trails from the homepage down to label page and lastly, the post page you're presently viewing. You can see it right at the top of this blog post and if you can't, below is the screenshot of just how it should look.


To add this to your blog, follow these simpple steps:

1. Log in to your blogger account and click on Design ( hey, I'm still using the old interface )

2. Click on Edit HTML and check Expand Widget Template box

3. Press CTRL and F on your keyboard and search for this code:

<b:include data='top' name='status-message'/>


4. Right below that, paste this:

<b:include data='posts' name='breadcrumb'/>


There may be two occurrences of <b:include data='top' name='status-message'> in your template, you should do the same thing if there's a second one.

5. Now search for this code:

<b:includable id='main' var='top'>


6. Just above it, paste this code:

<b:includable id='breadcrumb' var='posts'>
<b:if cond='data:blog.homepageUrl == data:blog.url'>
<!-- No breadcrumb on home page -->
<b:else/>
<b:if cond='data:blog.pageType == "item"'>
<!-- breadcrumb for the post page -->
<p class='breadcrumbs'>
<span class='post-labels'>
<a expr:href='data:blog.homepageUrl' rel='tag'>Home</a>
<b:loop values='data:posts' var='post'>
<b:if cond='data:post.labels'>
<b:loop values='data:post.labels' var='label'>
<b:if cond='data:label.isLast == "true"'> »
<a expr:href='data:label.url' rel='tag'><data:label.name/></a>
</b:if>
</b:loop>
<b:else/>
»Unlabelled
</b:if>
» <span><data:post.title/></span>
</b:loop>
</span>
</p>
<b:else/>
<b:if cond='data:blog.pageType == "archive"'>
<!-- breadcrumb for the label archive page and search pages.. -->
<p class='breadcrumbs'>
<span class='post-labels'>
<a expr:href='data:blog.homepageUrl'>Home</a> » Archives for <data:blog.pageName/>
</span>
</p>
<b:else/>
<b:if cond='data:blog.pageType == "index"'>
<p class='breadcrumbs'>
<span class='post-labels'>
<b:if cond='data:blog.pageName == ""'>
<a expr:href='data:blog.homepageUrl'>Home</a> » All posts
<b:else/>
<a expr:href='data:blog.homepageUrl'>Home</a> » Posts filed under <data:blog.pageName/>
</b:if>
</span>
</p>
</b:if>
</b:if>
</b:if>
</b:if>
</b:includable>


7. Now here comes the last part where you have to apply some skinning to the link tree. You can use the default one below or change it if you know a bit of css.

Search for this code:

]]></b:skin>


In the line immediately above it, paste this:

.breadcrumbs {
padding:5px 5px 5px 0px;
margin: 0px 0px 15px 0px;
font-size:90%;
line-height: 1.4em;
border-bottom:3px double #e6e4e3;
font-weight:bold;
}


Now save your template, view a blog post and you should see the breadcrumb navigation links right above your blog posts.

Further Explanation

On step 6, you need to do some editing if you're using numbered page navigation. It's not important though but I guess you might not want to see that label page get rather too long with up to 20 posts showing up. I repeat, this is only useful if you've done the numbered page navigation tweak.

Simply change 'data:label.url' to 'data:label.url + "?&amp;max-results=5"'

You should change 5 to the number of posts you set to display on a page.

December 1, 2011

How To Stop Unwanted Facebook Notifications From Close Friends

It first looked cool and useful when it started out but when it got extremely out of hands, I had to do something. When Facebook introduced smart list, they made it very easy to group your friends according to their importance to you. It also makes it easier to keep track of their facebook activities as you get notified when they post an update or upload a new picture. The downside of the smart list is that you get tons of notifications that's of no use to you. Even without commenting or liking the post, you get notified about it. Sometimes, you have to scroll through all these unwanted notifications just to get stuffs that are important to you and at other times, what you need just get drowned in the pool of these crazy notifications.

Stopping Notifications From Close Friends

-Log in to your facebook account and on the homepage, check the left column

-Scroll down till you see your lists

-Select Close Friends

-On the next page, check the top right corner and click on notifications


- Just select Off and those crazy, unwanted notifications stop.

How To Stop Getting Notifications From A Certain Friend

There are times when you just want to stop getting notifications from a certain close friend. Let's assume you have someone as a close friend but updates his/her status with boring stuffs every two seconds, and you want to stop getting notified about it without totally removing the person from close friends list or blocking updates from all close friends, here's just what to do.

-You need to visit that particular friend's profile

-At the top right, click on Subscribed


-Select Unsubscribe and you won't get anymore updates from that particular friend.

If you find this post helpful, it takes just five seconds to share on facebook. Thank you!

November 30, 2011

FindTheBest Solves The Internet Problem

If I am planning to spend a few hundred dollars on a tablet, laptop or smartphone, I want to be REALLY sure that’s it’s the best my money can buy. Thus, when I set out to buy one of these electronics, I do my homework with frustrated vigilance.

I consult many of my friends and multiple websites, surf Google’s mess of search results and read tons of consumer reviews. It’s tedious and time consuming.

I call this: The ‘Internet Problem’. And, it’s an issue I constantly face when I endeavor to purchase an expensive gadget.

Recently, however, I found a site that solved my painstaking problem: FindTheBest, an unbiased data-drive comparison engine.

It’s a new tool that helps consumers find products and services based on their preferences, without the wearisome research. I can sort and filter products, and then consult FindTheBest’s ranking system, so I know which products and services are the best for me.

I’ll give you an example:

Recently I shattered my iPhone. I dropped the poor, unprotected, device facedown on a concrete sidewalk. Needless to say, I was in need of a new phone. Since I wasn’t set on getting yet another iPhone, I went to FindTheBest’s smartphone comparison.

I knew I wanted my smartphone to have 4G capabilities, scratch resistant glass (I cannot be trusted), and LED Flash. FindTheBest had a filter for each one of my requirements. Once I filtered down my options, I compared my top three picks side-by-side.

After I narrowed down my options, I consulted their ‘expert blog’ to see what the industry experts had to say about my choices.

I felt comfortable using FindTheBest to make my final decision because they aggregate all the sources I would have had to search individually, in one spot. They compile their data from a variety of sources; government and institutional databases, research from a team of analysts, sophisticated algorithms and user-generated data is all verified before publication.

All in all, I was relieved to eliminate the flipping between multiple webpages to compare specs. It was one, simple search, that helped me pick the best smartphone for me. But more than that, it solved my ‘Internet Problem.”

November 26, 2011

Using Google Plus Profile For Blogger

You've definitely run some google searches and seen some blog author's google plus profile picture right beside search results, right? In a bid to make this work for my blog, I tried lots of stuffs out of which none of them worked. Just today, I logged in to blogger in draft just to see the upcoming blogger features and saw this option at the top right of the screen asking me to switch my blogger profile to google plus. It sounded good and I continued, reading the benefits and everything about it.

One of the key benefit that made me proceed with the switch was the fact that my google plus profile will be associated with site on search result pages. Also, whenever I comment on my blog or any other blog supporting comments with google account, my google plus profile will be linked instead of that boring blogger profile. It's a good one coming from google though because I never like blogger profile layout, the color scheme and all.

How Do I Link My Blog To Google Plus

This feature isn't yet published officially because it's only still available in Blogger in draft where blogger's upcoming features are first tested out. To switch your blogger profile to google plus profile and associate it with your blog:

-  You need to log in to draft.blogger.com

- You should see a pop up at the top right corner asking you to make the switch.

- If you can't find this, then follow this link

- Just follow the next couple of steps and enter your google account password when prompted.

- Mark the check box at the last stage and complete the profile switch.


What Are The Benefits Of Linking Your Google Plus Profile To Blogger?

Switching your blogger profile to google plus has lots of benefits and one of the one I like most is that you have one less online profile to worry about.

-You get access to upcoming Google+ features on Blogger

-Your posts gets highlighted in Google search results for your social connections

-Maintaining one identity instead of duplicate ones

Information on your blogger profile won't automatically transferred to your google plus profile, you have to select those information you want to display on your new profile including your displayed blogs. Also, this switch will make the blogger widget on your profile display your google plus profile instead and all existing comments made with with blogger profile will automatically redirect to your google plus profile when clicked.

Though it is said that my posts gets highlighted in Google search results for social connections, I haven't been able to see this since I made google plus my default blogger profile. I made the change just a few hours ago, just hoping it's really gonna have any effect in search results.

Even if it doesn't, I still feel convenient with that ugly looking blogger profile gone. :D

100% Uptime, Unlimited Space, Unlimited Bandwidth