Showing posts with label Tutorials. Show all posts

October 28, 2011

How To Secure Your (Facebook, Yahoo, Gmail) Passwords From Getting Hacked

You've heard cases of hacked facebook accounts, right? Anyone can be a victim due to ignorance but that is not an excuse for leaving your login unsecured. Although there may still be flaws even when proper security measures are taken, you're still guaranteed a certain degree of security when you take those basic precautions. The internet is a big place full of good guys and lots of crazies, we all know that, but some believe the only way to have fun is to unlawfully gain access to your account and change your password, making your own account inaccessible to you. Facebook, paypal, liberty reserve, MSN, yahoo and gmail accounts can all be hacked and that's a fact you don't want to overlook. The most common type of hack attack today is phishing.

"Phishing is a way of attempting to acquire information such as usernames, passwords, and credit card details by masquerading as a trustworthy entity in an electronic communication. Communications purporting to be from popular social web sites, auction sites, online payment processors or IT administrators are commonly used to lure the unsuspecting public. Phishing is typically carried out by e-mail spoofing or instant messaging,[1] and it often directs users to enter details at a fake website whose look and feel are almost identical to the legitimate one."

That is just how phishing is described on wikipedia and you don't want to lose your facebook or paypal account to that right? There are softwares that crack passwords using bruteforce or dictionary attacks and this is why you must make your passwords extremely strong.


How Do I protect Myself?

There are several precautions to take in order to secure your password and prevent yourself from getting hacked.

1. Using a strong password

This is the most important step to take. Never use a password that can be easily guessed like your child's name, your middle name, phone number and so on. Also, never use a word that can be found in the dictionary, your password can be easily cracked using dictionary attack. A strong password consists of letters, figures and symbols all mixed up randomly and I recommend up to 10-14 characters. An example of a strong password is this: ^nG='@9y5Y*%mF

Now, I'm not saying the password above can't be cracked, but it reduces the chance of getting hacked to almost 75% when compared to using a password as simple as your mobile phone number.

2. Beware of links you follow

You might seen a tempting link in your email or someone just posted and interesting link on facebook. Always think twice when websites ask for your log in details. There's a hack method called phishing that fools you to believe you're logging in to a legitimate site whereas the site you're about to log in to is only a 'photocopy' of the one you think it is. Yes, this method has ben used to hijack lots of facebook accounts in the past and it's still being used till date to hack paypal accounts. When you receive a link asking you to log in to your libert reserve account, for example, did you take the time to check your address bar to see that it's actually libretyreserve.com and not libertyreserve.com? Can you notice the similarity in he two addresses?

Once you fall victim to this hack attack, it doesn't matter anymore whether your password is strong or not, the hacker gets your login details in plain text.

3. Be careful with softwares you install

Downloading and installing every available software from questionable sources can get you into trouble. Did you know some programs contain spywares that spy on you and report everything you do on your computer to some hacker sitting somewhere in a room in another part of the world? Did you also know that keylogger programs can record every little keystroke you make on your PC and send it to a hacker's email? Are you aware that cracks and keygens often contain malicious softwares embedded?

I'll advise you to download only from certified sites like filehippo, brothersoft, softpedia and other sites like these especially if you don't know much about internet security.

4. Use different passwords for your accounts

Let's assume someone gets to know your yahoo password, the person will definitely try that same password on your facebook, hotmail, gmail and even paypal accounts. You know what would happen if you happen to use the smae password all through and that is why you should try to use different passwords for your online accounts.


5. Always update your antivirus and always use the best around

Your antivirus's virus database must be regularly updated. Why? This gives it a better chance to detect malwares and spywares that may try to steall your password.


6. Do not open spam mails

Do you often receive some stupid mails alerting you of winning some lottery you never played? Such mails can be tempting and I'll advise you not to even open them. They may contain links to phising pages or attachments that contain spywares and malwares.

7. Use SSL (HTTPS) encryption where applicable

When you're using https://, you have a certain degree of protection. A secure connetion (as oppossed to http:// ) only implies that no one gets to see or know what you're doing online and your sent and receive data is encryted. This is why all email providers and some social networks offer you encrypted login. Some sites like facebook and gmail give you the option in your account settings to always use SSL when you're logged in and I guess you should always use this where applicable.

You should also know that legitimate and certified stores and online shops ought to use https:// so as to protect your credit card details when shopping.

8. Beware of expired or invalid SSL certificate

Here is a note of caution, when you're logging in to a site and your browser reports that the certificate has expired or invalid, you should not proceed unless you know exactly what you're doing. there are bodies that issue this SSL certificate and illegitimate sites do not have valid certificates and a legitimate site can never encrypt your setting with an expired or invalid SSL certificate.
In a case like this, you should know someone is tampering with your connection or trying to fool you.


Although these suggestions can get you a long way in preventing your password from getting hacked, it's not 100% guaranteed that you're safe but it's better to do what you can to secure yourself. You definitely don't want to be a victim of a hack attack.

Help your friends on facebook by sharing this little piece of information.

October 24, 2011

Customizing Simple Machines Forum (SMF) Mobile Version (WAP2)

With the increasing rate at which people browse the internet, it's very important to optimize your site for mobile users. I have a web forum built with SMF 2.0 script and the mobile version isn't bad at all compared to the default mobile version SMF has to offer. Unlike MyBB that has a better mobile version plugin, SMF mobile version (also known as WAP2) looks rather too crude to be of interest to any mobile user. A lot of my web forum users use Opera Mini mobile browser and I had no choice but to make the forum's mobile version a lot better than what it was. Since mobile users are also more than 50%, I had to find ways to insert adsense for mobile into WAP2 to monetize it and I'm going to explain just how I did it. The screenshot below shows exactly how my forum looks like when viewed with Opera Mini.


Installing BXK WAP MOD

This modification gives your SMF WAP2 version a much better look. It's not available on SMF modifications site but i got it from Empireofthesun. Sadly, the site too has been having some technical issues for some months now and this mod is almost nowhere to be found online. Fortunately, I ran a search on my hard drive, found it and uploaded it to my old mobile site.

Download BXK WapMod 1.4-2

Now, this version supports SMF 2.0 RC5 but in case you're using SMF 2.0 or SMF 2.0.1, you need to emulate SMF 2.0 RC5 to install this mod.

Go to Package Manager, click on Advanced at the bottom right and emulate SMF 2.0 RC5
Click on Apply and now try to upload and install the mod.

How To Redirect Opera Mini To WAP2

This part is a bit tricky as you have to do edit a php file. Log in to your cPanel and locate index.php file. This is the only file that needs to be edited in order to redirect mobile users to the WAP version you just installed.

Edit index .php file by searching for this code:

if (isset($_SERVER['HTTP_ACCEPT']) && strpos($_SERVER['HTTP_ACCEPT'], 'application/vnd.wap.xhtml+xml') !== false)


And replacing with this:

if ((isset($_SERVER['HTTP_ACCEPT']) && strpos($_SERVER['HTTP_ACCEPT'], 'application/vnd.wap.xhtml+xml') !== false) || isset($_SERVER['HTTP_X_OPERAMINI_PHONE_UA']))


Now save the file and view your web forum with Opera Mini. You should be automatically redirected to WAP2.

Inserting Ads (Adsense, Inmobi, Admob or Buzzcity) To SMF WAP2

-You first need to generate and copy out the php code for the advert and paste it to a text file. If you're using Adsense for mobile, be sure you selected ads for both low and high end phones and copy out the codes in php format.

-Save the text file as ads.php (be sure the extension is php)

-Upload the php file to your domain root (public_html)

-Find Wireless.template.php (./public_html/Themes/default/Wireless.template.php)

-If you want the advert to appear at the top just above the header, find this code:

<center><p class="catbg">', site_logo(), '</p></center>


-Right below it, paste this code:

include('inmobi.php');


-If you wish the advert to appear below, right before the footer, find this code:

global $context, $settings, $txt, $options, $boardurl, $scripturl;


-Right below this, paste this code:

include('inmobi.php');


You can as well add the ads to any other location depending on whether you have a clear idea on php coding. Inserting the advert at a wrong place might render your template useless.

Adding External Links To SMF WAP

The procedure is quite similar to the one above. You need to write your links in php and save it as a text file. If you don't know how to get this done, simply edit the links and anchor texts in the example below:

<?php
echo "<div class=\"wapmenu\">\n";
echo "<a href=\"http://www.9jaclub.com/profile/?area=account;wap2\">Edit Account</a> | <a href=\"http://www.9jaclub.com/profile/?area=forumprofile;wap2\">Edit Profile</a>\n";
echo "</div>\n";
?>

-Now save this as links.php and upload to public_html.

-Locate Wireless.template.php file from your cPanel

-To show the links at the top, search for this code:

}

function template_wap2_boardindex()


-Just above this, paste this code:

include('links.php');


-To show the links at the bottom, find:

echo'
<center>', $txt['footer'], '</center></div>


-Just above it, paste this code:

include('links.php');


Everything posted here can be practically seen on 9jaclub.com and if you find this post helpful, say thanks by hitting the google +1 and facebook like buttons on the right. Thanks!

October 20, 2011

Progress / Loading / Status Bar For Firefox 4, 5, 6 & 7

Mozilla Firefox remains my favorite web browser, followed by Google Chrome while I don't even use Internet Explorer at all. Firefox went through quite lots of upgrades in the last couple of years, jumping from version 3 down to 7 but I started disliking the design right from version 4 due to some reasons: the progress bar disappeared and the design looked like an imitation of Opera and Google Chrome. I decided not to upgrade and stuck with Firefox 3.6.10 until recently when I had to install an addon which refused to install on Firefox 3. It was the Google+Facebook add-on I wrote a post on a few weeks back that made me upgrade to Fireox 7.0.1 and the design looked a lot different from Firefox 3 I had been using.


I missed the progress bar that used to pop up at the bottom whenever a page is loading on Firefox 3 plus the toolbars and menu was reduced to a little button labelled Firefox at the top left (kinda boring). Seriously, the new design looks a bit of Google Chrome and Opera but I still love firefox anyway and thought of ways to make Firefox 7 look more like version 3.

Of course, the first thing I did was to make the menu look just like that of version 3 which I was quite used to. You only need to enable the menu toolbar as shown below:

Just check click Menu Bar and you'll have that old look back but wait a minute, we're not done. Click on View and check all four options there:

That's that. It's almost looking like Firefox 3 but that progress bar that normally shows up at the bottom is missing, right? And the status bar isn't exactly what it used to be? We'll fix it, you only need to download an add-on, Status-4-evar, which adds a status widget and progress bar for Firefox 4, 5, 6 and 7. After installing the addon, restart your browser, go to Tools > Add-ons, Click on Options right below Status-4-Evar and configure as shown below:


If you got it right, you should have your status and progress bar back just like old firefox versions.

This works on all newer versions of firefox right from version 4 down to seven. It's feels good using the latest version of firefox but still with that old look you're much used to. Share the post if it helps!

October 16, 2011

How To Switch Back To Old Yahoo Mail Classic

Yahoo! was the very first email I opened and there are still a couple of things I like about it even though I'm stuck with gmail these days. Yahoo! Mail Classic looked simple and easy to use back then even when you're on a slow connection unlike the new yahoo mail that requires javascript to function properly. You might not notice the bug if you're on a fairly fast internet connection but it definitely sucks when you're connecting your computer to the internet using your mobile phone as modem. Maybe you just miss what yahoo mail used to look like and wish to return to that old, simple look that's so easy to use.


Well, when yahoo mail started with this new version (that I don't like that much), there was an option to switch back to yahoo mail classic but it's like this option has been removed. It's more like they're trying to force everyone to get used to it but there's a little trick to switch back to Yahoo! Mail Classic though, you only need to disable javascript on your browser. You don't know how?

How To turn off JavaScript on SAFARI

- Go to SETTINGS

- Select PREFERENCES

- Click SECURITY

- Uncheck ENABLE JAVA and ENABLE JAVASCRIPT

How To Turn Off Javascript For Internet Explorer:

- Go to TOOLS

-Click INTERNET OPTIONS

- Select SECURITY

- In security, click “CUSTOM LEVEL”

- scroll down and disable ACTIVE SCRIPTING in the scripting section.

Turn Off Javascript In Firefox

- Open TOOLS

- Click OPTIONS

- Select CONTENT

-Unmark ENABLE JAVASCRIPT

You're done disabling javascript on your browser, huh? Now let's switch back to that cool looking old Yahoo! Mail Classic. If you already have a yahoo mail page open, hit the refresh button or just launch mail.yahoo.com on your browser.

The image above shows exactly what you're gonna see on your browser. Select the second option that says Return to a previous version of Yahoo! Mail. Voila! You're done. You're now back to that good old yahoo mail but there's one more thing you need to do. TURN JAVASCRIPT BACK ON by following the same process you used to turn it off or some functions won't work and your browser might start showing some funny behaviour.

October 4, 2011

Import An Old Blog To A New One (For Blogspot)

Sometimes it's necessary to export an old blog to a new one without the need to copy and paste the blog posts one after the other. You might want to move your blogger hosted blog to a new google account and you can't possibly start copying the posts one after the other especially if you've written lots of stuffs. You might even decide to back up our blog posts. Whatever the case may be, importing and exporting your blog posts on blogger is very easy.

Exporting, Downloading or Backing Up Your Blog Posts

1. Login to your blogger account

2. Click on Settings > Export Blog

3. Now click the Download Blog button and the download begins.


The time taken to export the blog depend on the number of posts you've written. You have to be patient till the XML file is completely downloaded.

Importing The old Blog Into A New One

1. Go to Settings > Import Blog

2. Click on browse and select the xml file you exported earlier.

3. Input the captcha and upload. You can also choose to automatically publish the imported posts immediately.

That's all you need to do and all your posts from your old blog will be moved into the new blog.

Note: If you won't be needing the old blog anymore, I think you should either delete that blog or put a meta tag that'll make google bot remove it from it's index. Having the same content on the two different sites is not a good practice. It might hurt your search engine ranking in a bad way.

To remove the old blog from google index

1. Login to your blogger account and click on Design > Edit HTML

2. Now Press CTRL + F and serch for </head>

3. Paste the following code just above this


<meta content='NOINDEX, NOFOLLOW' name='ROBOTS'/>

September 30, 2011

Using Google Analytics On Your Blog

There are several free counters you can use to monitor traffic coming to your blog but only a few can equal google analytics in terms of detailed reporting. Google analytics is a free service provided by google to keep a track of your site or blog's visitors. Using google analytics is quite helpful as it gives you an idea of what your visitors find interesting on your blog and areas you should make improvements. With google Analytics, you get to see almost real-time data about your site's visitors. It's even possible to track how much you're earning from each of your blogs if you have more than one.

Google Analytics can provide you information about top search keywords relating to your site, referring websites and so on.

Installing google analytics on blogger is quite easy but you first have to sign up for the service with your google account.

1. Log in to google analytics and create a new account for your blog.


2. Hit the sign up button on the next page and proceed to the next stage where you're supposed to enter your website's URL and account name.


3. Enter your contact information and proceed


4. Copy out the code generated on the next page


5. Log in to your blogger account and click on Design > Edit HTML

6. By pressi9ng CTRL + F on your keyboard, search for </head>

7. Just above this, paste the code you copied earlier in step 4 and save your template.

You just successfully installed google analytics code on your site and should start seeing tracking reports in your google analytics dashboard in about 24 hours.

September 16, 2011

How To Upgrade Symbian ^3 To Symbian Anna OS

Now you can upgrade you Nokia E7, N8, C6-01 or C7 running Symbian ^3 operating system to the much better Symbian Anna without losing your personal files and customizations. Updating your Symbian ^3 firmware to Symbian Anna enhances your experience with your mobile with a much improved user interface. Now you can get a virtual keyboard in portrait mode, enhanced Nokia maps, better web browsing and web security among other improvements.

Symbian Anna key features include:

* User interface: Nokia N8, Nokia C7, Nokia C6-01 and Nokia E7 can now sport a fresh, new look with crisp icons and multiple usability enhancements. Typing on the touchscreen is much more easier with a split screen which makes it possible to see message threads, webpages, contacts or email view while typing on the virtual QWERTY keypad - now also available in portrait mode.

* Maps and navigation: Symbian Anna comes with an enhanced Nokia Maps with better search functionality, new public transportation routes and the ability to check-in to favorite geo-social network sites like Facebook, Foursquare and Twitter and so on.

* Browsing: A faster, easier-to-use web browser, delivering quicker page loads and improved device navigation allowing people to connect more easily to their favorite sites on the go.

* Better for business: Symbian Anna brings true business-grade security with improved data encryption on Nokia smartphones. Business users with a Nokia N8, Nokia C7, Nokia C6-01 or Nokia E7 can now easily and securely access their company intranet with IPSEC and SSL VPN enablers.

* Near Field Communications (NFC): The Symbian Anna software update also activates the NFC hardware in the Nokia C7, so people can now simply tap their Nokia C7s together to share contacts, photos, videos and play games; easily pair with NFC-enabled accessories from Nokia and others; and read NFC tags to check-in and more

How To Upgrade From Symbian ^3 To Symbian Anna

If you've read my previous posts on how to flash your a dead nokia phone through USB cable and how to hack symbian phones by flashing with a hacked UDA, this will look very easy.

You need to download these softwares to proceed:

i. Navifirm
ii. Phoenix 2011

Before proceeding, please note:

- Phone battery should be charged
- It is recommended to close all applications on your computer
- You may lose phone warranty by flashing the phone

1. In standby mode, type *#0000# on your phone and note the phone type, eg. RM-XXX

2. Remove your phone battery and note the numbers labeled Code

3. Be sure you're connected to the internet and run Navifirm

4. Under Products, select your phone model. This lists all available firmwares. Click on the latest firware on the list which is should be Symbian Anna.

5. Save the firmware files to your computer. Create a new folder in C:\Program Files\Nokia\Phoenix\Products\RM-XXX

Note that RM-XXX should be replaced by what you saw earlier in Step 1

6. Turn on your mobile phone and connect it through USB in PC Suite/OVI mode.

7. Run Phoenix software as Administrator

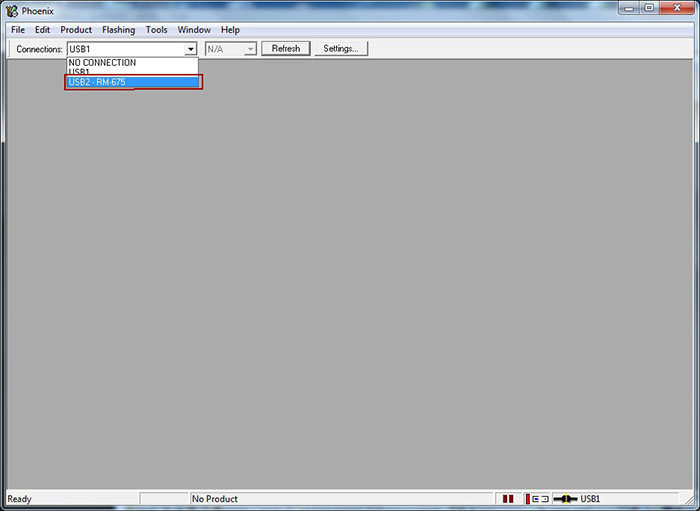
8. Select the USB port on which the phone is connected


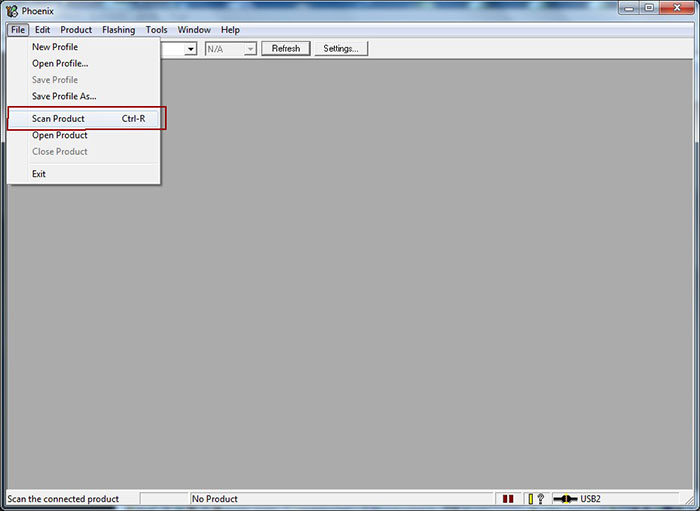
9. Click on File and select Scan Product to read phone information


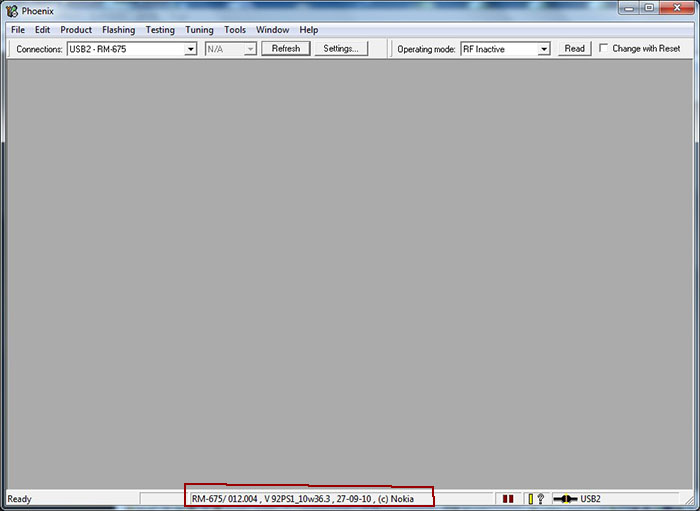
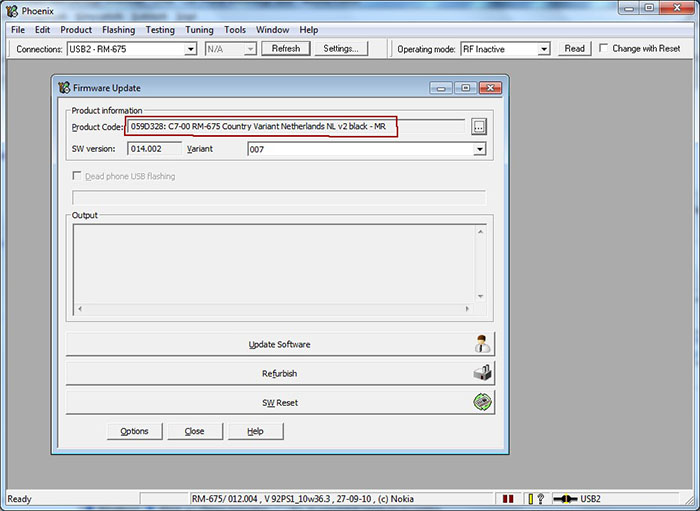
10. Your mobile phone information should be shown as shown below provided there's a working connection between your computer and mobile phone.


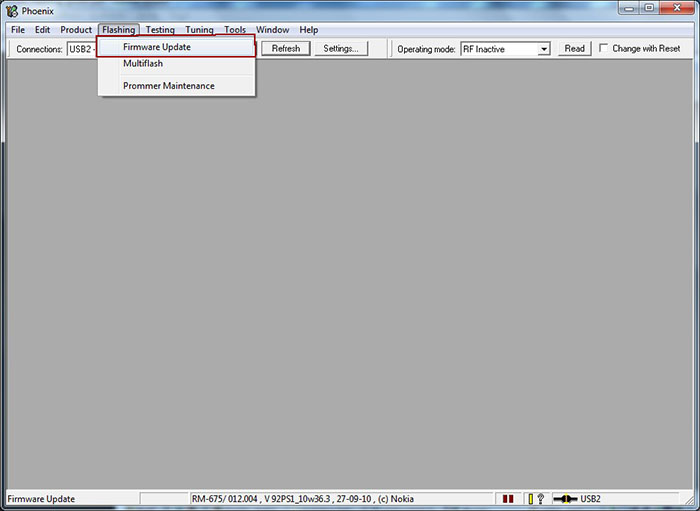
11. Click on Flashing and select Firmware Update as shown in the screenshot below


12. If you copied your firmwares to the folder cretaed in step 5, your firware files will be automatically selected.


13. Click on Update Software to start the flashing procedure. (You can click on Refurbish button only if you wish to have all user data and applications erased and phone will be reseted to factory settings.) Do not disconnect the mobile phone till the process is fully complete. The operation usually takes 2-3 minutes, when finished, a window will appear: "Firmware updating succeded.".

Flashing with Phoenix 07.jpg

14. Click OK and remove disconnect your phone from the computer. Turn on the phone and press *#0000# to check out the new firmware.


Updating your Symbian ^3 to Symbian Anna is quite an easy process but there's still that slight possibility of killing your phone through flashing though I've done it a dozen times successfully. Note that you're doing this at your own risk, not mine.

September 1, 2011

Google Hacking ( Advanced Google Search )

Google remains the most widely used search engine in the world but there's more to google search than what most people know. Advanced google search (which many refer to as google hacking) gives you what you want more easily. This google search tricks are quite easy and they've been in existence for quite a long time but I'm pretty sure not all internet users are familiar with the strings (also known as operators). We're not doing anything illegal, google officially have this listed.


1. define:
You can use google as your dictionary anytime with this simple string. An example is define: idiosyncrasy . This example searches the internet for all definitions of the word 'idiosyncrasy'.

2. site:
With this search string, you can limit your search to just a site. An example is make money online site:doncaprio.com. This search string allows you to search all posts on this blog relating to making money online.

3. related:
This particlar string gives you all sites relating to the one in your search query. related:www.google.com lists all similar to google.com

4. filetype:
This becomes useful when searching for a particular file type. Assuming you're a webmaster looking for pdf ebooks on search engine optimization, running a google search that looks like SEO tips filetype:pdf will get you loads of pdf documents written on that.

5. cache:
This can be useful when you intend to see what a page looks like in the pages. it searches google's cache for your query. It can be of use when a site is down or refuses to load. An example is cache:www.doncaprio.com. The cached pages shown might be different from the present one since the content on the homepage is always changing.

6. weather:
This gives you the weather of your specified city. Google shows the weather condition as the first result if it recognizes the city but all you will have sre links to other pages if the city isn't recognized. An example is weather:lagos Nigeria

7. allintitle:
You can limit your search to only sites having your specified terms in their titles. Let's assume you're searching for cgi proxy servers, you can simple input allintitle:start using cgiproxy and most of the sites on the search result page will definitely have your query as their title.

8 intitle:
This is similar to allintitle: with only a slight difference. Searching for paypal unsupported intitle:Nigeria returns pages with Nigeria in their titles and paypal unsupported anywhere in the document or web page.
Note that allintitle:start using cgiproxy is the same as intitle:start intitle:using intitle:cgiproxy

9. allinurl:
You can specify parameters in the url of search results with this operator. allinurl:cgi bin nph proxy cgi will return cgi proxy servers since the strings specified in the search query are found in cgi proxy sites url.


10. inurl:
It's almost the same as allinurl:
Note that allinurl:cgi bin nph proxy cgi is the same as inurl:cgi inurl:bin inurl:nph inurl:proxy inurl:cgi

11. allintext:
You can specify parameters in the text of results with this operator.Only pages with the specified terms will be returned in search results. allintext:nokia cooker nfe core navifirm will return only pages containing the specified terms.

12. intext:
Almost the same as above with little variation as explained in 10 and 11.

13. ~
This can be used to find synonyms and words relating in meaning to your search query. Searching for ~image ~designer will return pages with these exact words and similar terms such as graphic design, photo designing, etc.


There are several others and there are speculations that certain google operators can be used to find passwords and other sensitive information online but such hack tricks can't be contained in the body of this blog posts. The tips above are only to enhance your google search. Please share it if it helps.

August 29, 2011

How To Create A Facebook Fan Page And Adding Like Box To Blogger

Facebook isn't just a social site that helps you connect and share with the people in your life, it can be a great way to connect with your business clients or blog readers. I have written some posts on facebook integration with blogger like adding facebook comment box, adding facebook like button and large social bookmarking button but having a facebook fan page can not be overlooked. Creating a facebook fan page is an effective way to ensure you keep in touch with your blog visitors on the world's favorite social network. Though there are millions of Facebook fan pages, there are still some people who find it hard to create a fan page because they're probably new to facebook. This blog post explains the basics on how to create a facebook fan page, a like box and how to integrate the widget to your blogger hosted blog.

To create a fan page with a like box, follow these steps:

1. Log in to your facebook account and click here to create a fan page

2. Select a page category depending on what you're creating a fan page for. You should select Brand or Product if it's a blog.

3. Select Website as sub-category

4. Enter Your site name in the next available space e.g Doncaprio.com or The 9ja Geek's Journal

5. Agree to the terms and continue.


6. The next page takes you to where you're asked to upload the page's profile picture. You can use your blog's logo

7. You can invite your facebook friends to like your fan page or import email contacts to notify about your new fan page

8. Enter the basic info about your blog or website on the next page.


Creating A Facebook Like Box

- Click here to get started.

- Enter your fan page URL and other parameters as shown below


- The sample shown above can be different from yours depending on your choice.

- Click on Get Code when done with the configuration


How To Add Facebook like Box To Blogger

- Clicking on Get Code presents two different sets of codes

- Copy the first one (ifame)

- Log in to your blogger account

- Click on Design

- Select Add Widget on the location you wish the facebook like box to appear

- Paste the code you copied earlier and save

- View your blog and the Widget should appear at the very spot.


How To Get Facebook Fan Page Custom Username


A default facebook fan page URL can be quite long and hard to remember. My facebook fan page looks like http://facebook.com/capriotips which is so short and simple. You must have at least 25 likes before getting a custom facebook username.

On your browser, launch http://facebook.com/username and select your desired username for your fan page.

Automatically Updating Your Facebook Fan Page

Instead of sharing every blog post all by yourself, you can synchronize your blog's RSS Feed with your facebook fan page and every blog post will be pushed to your fan page as well as your personal profile to see. I wrote a post earlier how you can automatically publish your blog's RSS feed to your facebook profile and fan page and you can as well check it out.

August 16, 2011

Unlock ZTE and Huawei USB Modems / Data Card

Unlocking your USB modem removes all restrictions and gives you the chance to use other network operator SIM cards. My post on unlocking Huawei USB modems still works but this post explains how to unlock ZTE USB Modems easily. I tried looking for a free online tool to unlock ZTE Modems like the one for Huawei found here but couldn't find one that's reliable.
I finally came across an unlocker that unlocks ZTE modems along with huawei as well for free.

-First download DC - UNLOCKER 2 CLIENT

-Extract the content of the zip file to a zip folder

-Locate dccrap.exe and run.

-Disconnect your internet connection and plug your ZTE or Huawei USB modem with an alien SIM card (an unsupported SIM card from a different network operator) inserted.

-If you're to unlocking a Huawei modem, there's no need to change your SIM. simply plug your modem into your computer's USB port.

-If the connection manager pops up, close the window.

-Depending on your type of data card, select either ZTE or Huawei from DC - UNLOCKER 2 CLIENT user interface.

-Click on the magnifying glass to automatically search for the modem


-Once the modem is detected, click on Server and type doncaprio.com in the username field and doncaprio for password.

-Click Unlocking menu, then select unlock.


-Wait for a moment till the programs displays this message: unlock is successfully done

-Now you can use any SIM card on your unlocked USB modem

Download ZTE / Huawei modem unlocker from Capriofiles

Download ZTE / Huawei modem unlocker from Hotfile

August 2, 2011

How To Add Facebook Comment Box For Blogger

It's getting harder and harder to separate blogging from facebook as it remains one of the top channels to drive traffic to your blog. Using facebook comment on your blog has a makes your blog more interactive and drives in more traffic as commenting on your blog also shares the topic on the visitor's facebook wall.

This tutorial explains how to add facebook comment box to your blogspot blog easily.
1. Log in to your blogger account and disable blogger default comment.

Settings > Comments

Choose Hide and save your setting.

This is optional though, it depends on whether you intend to have two comment forms on your blog.

2. Next is creating your facebook application. Click here to create a facebook application.

i. Input the Application name
(ex., The 9ja Geek's Journal. This makes the the post on your visitor's wall look like via The 9ja Geek's Journal)
ii. Check Agree and click on Create Application. This takes you to the basic settings page.

iii. Change your Icon . (it must not b more dan 16*16)
Upload your own Icon. (it must not b more dan 75*75)

Then Scroll down and save changes

iv. Copy your App ID to a note or notepad


v. Click on Edit Settings and select Website.

vi. Write your site URL in full ending with a slash /
(ex. http://www.doncaprio.com/ or http://myblog.blogspot.com/

vii. Input your site domain
(ex. doncaprio.com or blogspot.com if you're publishing using blogspot sub domain)


3. Next is adding the required codes to your blog.

i. xmnls attribute
ii. SDK script
iii. Comment form code

Log in to your blogger account and click on Design > Edit HTML > Check Expand Widget Template

i. XMNLS ATTRIBUTE

-Press Ctrl + F and search for this code:

<html

This should be found on the second or third line of your template.

- Right in front of this, add the following code:


xmlns:fb='http://www.facebook.com/2008/fbml'

-Be sure to have a space before and after this code. Take a look at the example below

<html xmlns:fb='http://www.facebook.com/2008/fbml' expr:dir='data:blog..............2005/gml/expr' >


ii. SDK SCRIPT

- Search for this code:

<body>


-Immediately after this, add:


<div id="fb-root"></div>
<script>
window.fbAsyncInit = function() {
FB.init({
appId : 'YOUR APPLICATION ID HERE',

status : true, // check login status
cookie : true, // enable cookies to allow the server to access the session
xfbml : true // parse XFBML
});

};

(function() {
var e = document.createElement('script');
e.src = document.location.protocol + '//connect.facebook.net/en_US/all.js';
e.async = true;
document.getElementById('fb-root').appendChild(e);
}());

</script>


-Be sure to change 'YOUR APPLICATION ID HERE' to the application ID you copied earlier!


iii. COMMENT FORM CODENow here comes the last part of the steps.

-Press Ctrl + F and find <data:post.body/>.

- Immediately after this, paste the following code:


<div style='border: 1px #3b5998; background-color: #eff3fa;'><div align='center'>
<b:if cond='data:blog.pageType == &quot;item&quot;'>
<script src='http://connect.facebook.net/en_US/all.js#xfbml=1'/>
<div><fb:comments width='450' expr:title='data:post.title' expr:href='data:post.url' expr:xid='data:post.id'/></div><div align="right"><a href="http://www.doncaprio.com/2011/08/facebook-comment-box-for-blogger.html" target="blank"><small>[Get Facebook Comment For Blogger]</small></a></div>
</b:if>
</div>
</div>

Change the number (450) written in red to fit your desired width.
Also, if you're using a magazine style template, you might have more than one <data:post.body/> in your template. You must locate the one that contains the post body on the post page.

If you're confused about the right <data:post.body/>, search for this code instead:


<div class='post-footer-line post-footer-line-2'/>


Paste the comment form code right below it.

Update

If you're using a dark template, the above light comment box might not be the best for your blog. You might try the dark facebook comment box below.


<div style='border: 1px #000000; background-color: #000000;'><div align='center'>
<b:if cond='data:blog.pageType == &quot;item&quot;'>
<script src='http://connect.facebook.net/en_US/all.js#xfbml=1'/>
<div><fb:comments width='450' expr:title='data:post.title' expr:href='data:post.url' colorscheme='dark' expr:xid='data:post.id'/></div><div align="right"><a href="http://www.doncaprio.com/2011/08/facebook-comment-box-for-blogger.html" target="blank"><small>[Get Facebook Comment For Blogger]</small></a></div>
</b:if>
</div>
</div>


Share this post if it's helpful and leave a comment if you encounter any problem trying to make it work. It's working perfectly as you can see the comment box right below this post.

June 7, 2011

How To Flash Your Nokia Phone Through USB

In this post, I'll be explaining how to flash your Nokia phone or update the firmware using just a usb cable without any flashing box like JAF, Cyclone and the rest of them. All that is needed is a usb cord, two softwares and an internet connection. I previously made two posts on servicing nokia phones. One was how to read nokia phone security code using usb and the other was how to reset the security code back to the default code.

A lot of people often hear about "flashing mobile phones" without knowing what it actually means. Flashing a phone means re-installing the phone's firmware files, that is, re-installing the operating system of the phone. When a phone's operating system files are corrupt due to incompatible applications, virus attack and so on, flashing might be the only solution when restoring factory settings doesn't work. Apart from this, flashing a phone too can be used to update the firmware to a newer version, install a cracked firmware, "wake" a dead phone, etc.
I have to emphasize that flashing a phone shouldn't be done just for fun as it might be useful and dangerous at the same time. Yes, flashing a phone can wake a dead phone, so also flashing a working phone can kill it!

ALSO NOTE THAT THESE SOFTWARES

To flash your phone through usb, you need these:

i. Navifirm - to download the phone's firmware
ii. Phoenix Service Suite
iii. Nokia PC Suite
iv. A good USB cable

1. Install Phoenix. This might take a pretty long time if you're using a slow computer but you've got to be patient

2. Run Navifirm but be sure to have a working internet connection before doing this. It connects to the internet and loads all available Nokia phones firmwares. This too also takes a long time and requires a steady internet connection so you need some patience here too.

3. Be sure your phone's battery is charged to at least 50% though flashing should take less than 10 minutes.

4. Select your phone type under Products. It is located on the phone just beneath the battery. For example, N97's product type is RM-505, RM-133 for N73 and RM-596 for Nokia N8. (You can as well check it by dialling *#0000# in standby.)

5. Wait till it loads Releases. From here, you can see all available firmware versions. Select the latest you find there.

6. It now loads Variants, select your desired product code from the list. You can also check beneath the battery to find the original product code.

7. Now select all the files and download. Select Download with IDMM (Internet Download Manager) if you have it installed it on your PC. If not, select, Download with program and choose the destination folder.

8. Go to C:/Program Files/Nokia/Phoenix/Products
Create a folder with the name as your phone product type.
For example, for Nokia N97, the folder will be named RM-505
The firmware files you downloaded will then be located in C:/Program Files/Nokia/Phoenix/Products/RM-505

9. Now run PHOENIX and connect your mobile phone in PC Suite mode. If phoenix detects your phone automatically, skip steps 110-14.

10. In Phoenix, click File > Manage Connections > New.

11. Now select the type of cable you are using. If you are using DKE-2, CA-53, Micro USB cable, select USB.

12. Click Next. It will find your product and say FOUND. If it doesn’t find any, you can try changing your cable type by clicking Back.

13. Click Next and then Finish.

14. Now your cable type (USB) appears in the connection list. Select it. Click APPLY and then CLOSE.

15. Now select File > Open Product.

16. A list of RM codes will open. Select your phone’s RM code.

17. Now select File > Scan Product.

18. Your phone’s firmware info will appear at the extreme bottom of the Phoenix Service Software window.

19. Now select Flashing > Firmware Update. At this point, Phoenix will automatically load the firmware files we talked about in step 8. If it doesn't, make sure you named that directory accordingly and please go over step 8 again.

20. If everything up to step 20 goes well, select “Refurbish”, wait until the “Successful” dialog box appear (DO NOT touch or disconnect the phone or USB cable during the process). Press OK, phone will disconnect and restart.

At the end Phoenix will tell you to disconnect your phone as the flashing has finished butome phones may not boot up automatically after the flashing has finished. In those cases, remove the battery and then insert it and manually start the phone.


FLASHING A DEAD PHONE WITH PHOENIX

The procedure is almost same as above but with litle differences.


1. Start Phoenix. Connect your phone through USB Cable (we are flashing a dead phone so the phone is off)

2. Click File > Open Product. Select your RM code from the window that appears. Click OK.

3. Click File > Manage Connections. Select No Connection. Then APPLY and CLOSE.

4. Now select Flashing > Firmware Update.

5. Check the option “Dead Phone USB Flashing”.

6. Click Refurbish and the flashing process is started.

7. After some time, flashing will pause asking you to turn on your phone.

8. Press the POWER button of your phone until the backlight comes up.

9. Flashing will proceed. Your phone will automatically start when the flashing finishes. When done, you can safely remove your data cable from handset.


Download Navifirm from Capriofiles

Download Navifirm from Hotfile


Download Phoenix 2011 from Mediafire (Recommended)

Download Phoenix from Hotfile 1

Download Phoenix from Hotfile 2

Download Phoenix from usaupload

May 18, 2011

Webcam Recorder For Yahoo Messenger, MSN, Skpe etc.

Spending your leisure time chatting on your yahoo messenger or other IM applications like Skype or MSN messenger can be fun but if you've ever considered recording your video chat, then this post is definitely for you. CamStudio 2.0 is an application that can record your companion's webcam during IM chat. It can record either in .avi (video) or .swf (flash) format.

It's such a cool application to have especially if you wanna watch those video chat sessions over and over again. ;) There are lots of softwares like this across the internet but most of them are sharewares. They are trial versions you can only use for a while but CamStudio is an open source program and given out free of charge.
Apart from being able to record webcam from videos, CamStudio can also records all screen and audio activity on your computer and create industry-standard AVI video files and using its built-in SWF Producer can turn those AVIs into lean, mean, bandwidth-friendly Streaming Flash videos (SWFs).

Here are just a few ways you can use this software:

* You can use it to create demonstration videos for any software program
* Or how about creating a set of videos answering your most frequently asked questions?
* You can create video tutorials for school or college class
* You can use it to record a recurring problem with your computer so you can show technical support people
* You can use it to create video-based information products you can sell
* You can even use it to record new tricks and techniques you discover on your favourite software program, before you forget them

Download Camstudio 2.0 from Capriofiles
Download CamStudio 2.0 from Hotfile

April 27, 2011

How To Make Your Blog Load Faster

Have you ever wondered why your blog has a high bounce rate? A "bounce visit" simply means a single page visit and this might be injurious to the growth and popularity of a blog. Are you asking what the heck bounce rate means? Bounce rate is calculated as the percentage of single page visits in relation to the total number of visits.


When your blog takes too long to load, visitors might be discouraged from proceeding and decide to close the tab. I often do that especially when I'm on a slow connection. When building a blog, a lot of things must be put into consideration and this includes visitors on slow connections. You might think everything is alright if you're on a pretty fast LAN connection but try to load your blog using a slow dial-up connection before concluding.
Several things things can contribute to a high bounce rate ranging from low quality contents to lack of internal links and so on but excessively long page load time is one of the major contributors.

To reduce page load time:

1. Be sure you don't use too much javascripts on external servers. Scripts place on a slow external server will definitely increase your blog's page load time.

2. Images quite make a blog look attractive but the size and resolution must be moderate.

3. You should realize that you can't use all the available blogger widgets, select only the important ones.

4. Always check your blog in all popular web browsers after every change you make.

5. If you're using a custom blogger template, you can upload those images used in styling the template in a blog draft post and replace the links in the template. Some are some are uuploaded on external servers like tinypic and the rest of them. Check your template and change them if you can.

6. Always check your google analytics account to know when you have a problem with bounce visits.

With these little tips, your blog will surely load faster. Share this post if it helps and please subscribe to our feed.

April 11, 2011

How To Hard Reset Sony Ericsson Xperia X1

There are several ways to hard reset your Sony Ericsson Xperia X1 Android smartphone.

The easiest way is by clicking Start > Settings > System > Clear Storage
Then enter the number 1234 and press Yes.

Another way is by turning off the phone, pressing and holding the two silver keys (left and right) situated just below the screen. Now insert the stylus pen into the tiny hole which is situated around the bottom right of the back of the device for 5 seconds. Follow the on screen instructions.
It is advisable to back up your data before performing a hard reset.

Also note that a soft reset can be performed by ONLY inserting the stylus pen into the tiny hole for 5 seconds while the phone is on.

If the above method isn't working on your Xperia X1, then follow these steps:

1. Hold volume down key + power key simultaneously
2. The phone will turn into boothrom mode (screen is like rainbow)
3. Hold th 2 silver buttons just right below the screen and insert the stylus into the hole which is situated around the bottom right of the back of the device for some seconds
4. After a while press R on keyboard to perform hard reset.

April 8, 2011

View And Download Full SIze Image on Facebook Mobile

There has been a little upgrade to facebook here and there lately but in actual fact, it also came with a lot of downgrades. It's no longer possible to view large pictures on facebook mobile. if you're always stuck on http://m.facebook.com, the most commonly used mobile version (there's also http://touch.facebook.com), viewing full size photos is no longer available like it used to be.

This post explains how to view and download full size pictures on facebook at the exact resolution it was originally uploaded. It all becomes easier if you're using Opera Mini, so I'm gonna explain how to view large full size pictures on Oper Mini 4.2, 5.0 and 4.0.
You can as well apply the same principle if you're using a different mobile browser.

* Fist locate the image you want to view in full size or download.

* Highlight the image or place the cursor on it and press 1 to show the context menu


* Select Open Image

* Now open the address bar, you should see the image url like this

photos-h.ak.fbcdn.net/hphotos-ak-snc6/180978_1665467234343_1167126869_31533730_4420131_s.jpg

OR

photos-h.ak.fbcdn.net/hphotos-ak-snc6/180978_1665467234343_1167126869_31533730_4420131_a.jpg


* Now change the last letter before ".jpg" to "n" (without quotes. The letter can either be "a" or "s". Just change it to "n"

* Now launch the changed image link, you can now view the full size image with and download with the original resolution.


April 4, 2011

How to Use Hanler UI Java Applications

Everyone loves to surf the internet, but the cost of using the internet can be quite expensive in developing countries where there are so many restrictions.

According to Yk_Handler, "The Idea of Customizing the network appear a couple years ago, when i found some people in my country modify the String of Online Application Server to get a free internet access. So it came to me to make it more dynamic."
"Actually, I got minimum knowledge about the Free Internet, I assume that it was a tunneling method... So, i will just Explain about few input and how it will take effects on the application."


In HandlerUI app we will find this input, I will expain it with examples (assume the application will make a connection to the server with this URL: "http://wap.capriofiles.com:80/subpath/index.html"):
Filling Queries:

* Front Query: Fquery@
-Result: http://Fquery@wap.capriofiles.com:80/subpath/index.html

* Middle Query: @MQuery
-Result: http://wap.capriofiles.com:80@MQuery/subpath/index.html

* Back Query: ?BackQuery
-Result: http://wap.capriofiles.com:80/subpath/index.html?BackQuery

* Filter: *(http:\https
-Result: https://wap.capriofiles.com:80/subpath/index.html
- Other Examples: filter: *(forum\www)
-Result: http://wap.capriofiles.com:80/subpath/index.html

*Add Port to non-Port URL: 8080
-Result: http://wap.capriofiles.com:80/subpath/index.html (the url already contain port, so it will not change it)
-Other ex with url like this: http://wap.capriofiles.com/subpath/index.html
-Result: http://wap.capriofiles.com:8080/subpath/index.html


*Remove Port: Checked
-Result: http://wap.capriofiles.com/subpath/index.html

* - Proxy Type: -http
-Proxy Server: www.google.com
-Result: http://www.google.com/subpath/index.html
Extra Header added: X-Online-Host: wap.capriofiles.com


Other Examples:
- Proxy Type: -host
-Proxy Server: www.google.com
-Result: http://wap.capriofiles.com/subpath/index.html
Extra Header added: X-Online-Host: www.google.com


UserName:
-Password:
-Result: Extra Header added: Proxy-Authorization
(for Proxy login, if empty, the header will not be added)


NB: this will take effect only on communication between the application to the application Server.

For examply, the settings in Opera Mini Handler will only have effect between the application and opera mini server, not between the application and the addresses you launch in the browser.

I hope this helps old and new users to these Handler applications.

Download Youtube Videos as MP3 Audio

We all know there are lots of musical videos on youtube but sometimes, you might wish to have those musical videos as MP3 audio files in your phone music player instead. This post explains how to convert Youtube videos to MP3 files online and downloading the mp3 file directly to your phone or computer.

Go to http://m.youtube.com or http://www.youtube.com, search for the video file. After that, copy the link.

* Open another tab, go to http://www.youtube-mp3.org

* In the Query box, paste the youtube video link u copied earlier


* Click on Convert video button, the audio link will be generated and u can now download the file

List of Opera Mini Servers

Some mobile operators often block popular opera mini servers on their networks. This is why you should have the list of alternative opera mini servers at your fingertip to use with your opera mini handlers..
You might even just decide to change your server jutto see if there will be a difference in the speed at which web pages are loaded. It is important though to know that old opera mini servers built mainly for old opera mini versioms like Opers 2.06 and 3.10 will not work for newer versions like 4.2 and 5.0.
List of Opera Mini 2.0, 2.06, 3.10 and 3.12 Alternative Servers
80.232.117.10:80
80.232.117.41:80
195.189.142.68:80
195.189.142.69:80
195.189.142.77:8080
195.189.142.78:8080
195.189.142.88:80
195.189.142.84:8080
195.189.142.90:80
195.189.142.91:80
195.189.142.183:8080
195.189.142.187:8080
80.232.117.10
lvs.opera-mini.net
nokia-s40-1-cust.opera-mini.net
nokia-s40-2-cust.opera-mini.net
nokia-s40-3-cust.opera-mini.net

195.189.142.68
nokia-s40-4-cust.opera-mini.net
nokia-s40-5-cust.opera-mini.net
server.operamini.com
bite-cust.opera-mini.net

195.189.143.4
tmn-cust.opera-mini.net
f143-004.opera-mini.net

80.232.117.41
p09-05.opera-mini.net

195.189.142.90
p01-06.opera-mini.net

195.189.142.91
p08-03.opera-mini.net

195.189.142.88
p08-16.opera-mini.net

195.189.142.86
p08-04.opera-mini.net

195.189.142.80
p01-03.opera-mini.net

80.232.117.178
cust03.opera-mini.net

80.232.117.40
p09-02.opera-mini.net

195.189.142.69


List of Opera Mini 4.0, 4.1, 4.2, 5.0 and 6.0 Alternative Servers

80.239.242.19 : 80
80.239.242.20 : 80
80.239.242.49 : 80
80.239.242.50 : 80
80.239.242.51 : 80
80.239.242.64 : 80
80.239.242.65 : 80
80.239.242.80 : 80
80.239.242.81 : 80
80.239.242.112 : 80
80.239.242.113 : 80
80.239.242.158 : 80
80.239.242.159 : 80
80.239.242.174 : 80
80.239.242.222 : 80
80.239.242.223 : 80
80.239.242.250 : 80

82.145.208.20
82.145.208.21
82.145.208.36
82.145.208.37
82.145.208.68
82.145.208.69
82.145.208.84
82.145.208.85
82.145.208.100
82.145.208.101
82.145.208.116
82.145.208.117
82.145.208.132
82.145.208.133
PORT : 80

82.145.210.16
82.145.210.17
82.145.210.32
82.145.210.33
82.145.210.48
82.145.210.49
82.145.210.64
82.145.210.65
82.145.210.80
82.145.210.81
82.145.210.96
82.145.210.97
82.145.210.112
82.145.210.113
82.145.210.128
82.145.210.129
82.145.210.144
82.145.210.145
82.145.210.160
82.145.210.161
PORT : 80

64.255.180.113 : 80
64.255.180.129 : 80
64.255.180.130 : 80
64.255.180.192 : 80
64.255.180.208 : 80
64.255.180.250 : 80

64.255.164.4
64.255.164.5
64.255.164.20
64.255.164.21
64.255.164.36
64.255.164.37
64.255.164.52
64.25 5.164.53
64.255.164.68
64.255.164.69
64.255.164.84
64.255.164.85
64.255.164.100
64.255.164.101
64.255.164.116
64.255.164.117
PORT : 80

82.145.209.253
95.189.142.132:80
g4-nerv1.opera-mini.net
94.246.126.253:80
g4-gehirn1.opera-mini.net
64.255.180.31:80
r01-15.opera-mini.net
64.255.180.63:80
r03-15.opera-mini.net
94.246.126.31:80
t01-16.opera-mini.net
94.246.126.63:80
t03-16.opera-mini.net
80.239.242.253:80
global-4-lvs-seele.opera-mini.net
64.255.180.31:80
r01-15.opera-mini.net
64.255.180.63:80
r03-15.opera-mini.net
94.246.126.31:80
t01-16.opera-mini.net
94.246.126.63:80
t03-16.opera-mini.net
64.255.180.253:80
global-4-lvs-usa.opera-mini.net
64.255.180.31:80
r01-15.opera-mini.net
64.255.180.63:
64.255.180.31:80
r01-15.opera-mini.net
64.255.180.63:80
r03-15.opera-mini.net
94.246.126.31:80
t01-16.opera-mini.net
94.246.126.63:80
t03-16.opera-mini.net -
94.246.126.253:80
g4-gehirn1.opera-mini.net
94.246.126.62:80
t03-15.opera-
mini.net
94.246.126.30:80
t01-15.opera-mini.net
213.236.208.67:80
mxo.opera.com
80.239.242.253:80
global-4-lvs-seele.opera-mini.net
94.246.126.252:80
global-turbo-1-lvs-gehirn.opera-mini.net
64.255.180.253:80
global-4-lvs-usa.opera-mini.net
94.246.126.253:80
g4-gehirn1.opera-mini.net
64.255.180.31:80
r01-15.opera-mini.net
64.255.180.63:80
r03-15.opera-mini.net
94.246.126.31:80
t01-16.opera-mini.net
94.246.126.63:80
t03-16.opera-mini.net
91.203.96.125:80
g4-nerv2.opera-mini.net
80.239.242.253:80

100% Uptime, Unlimited Space, Unlimited Bandwidth